File ♣ upload.

Basic Setup
A complete, beginner-friendly guide to connecting your Framer upload component to any cloud storage. No coding experience required.

To follow this guide, you’ll need the
Quickstart
01
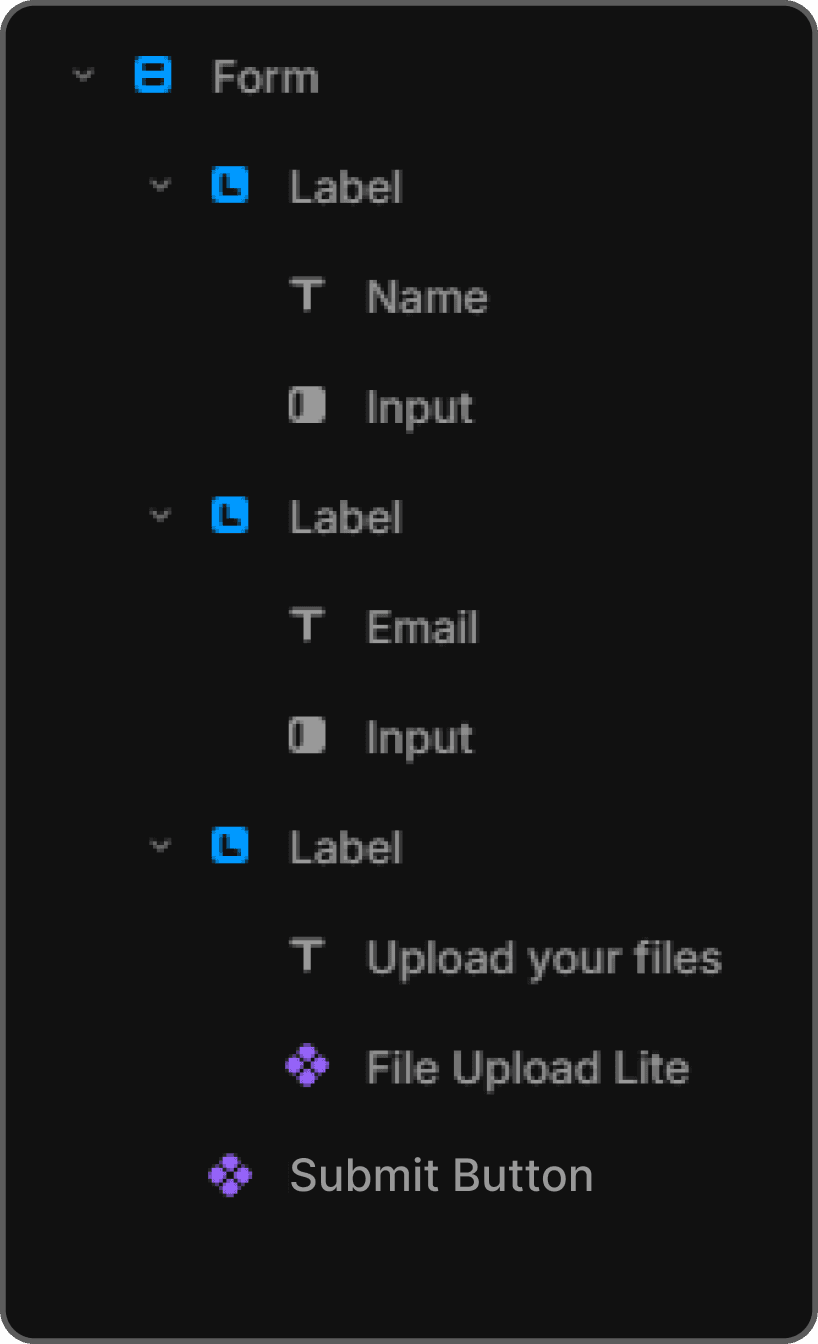
Drag the component inside your Framer Form Container.
The Button Logic: Remember, the button on the component is only for choosing files. To actually upload them, you must click your form's Submit button.
02
Sync the Names (Crucial):
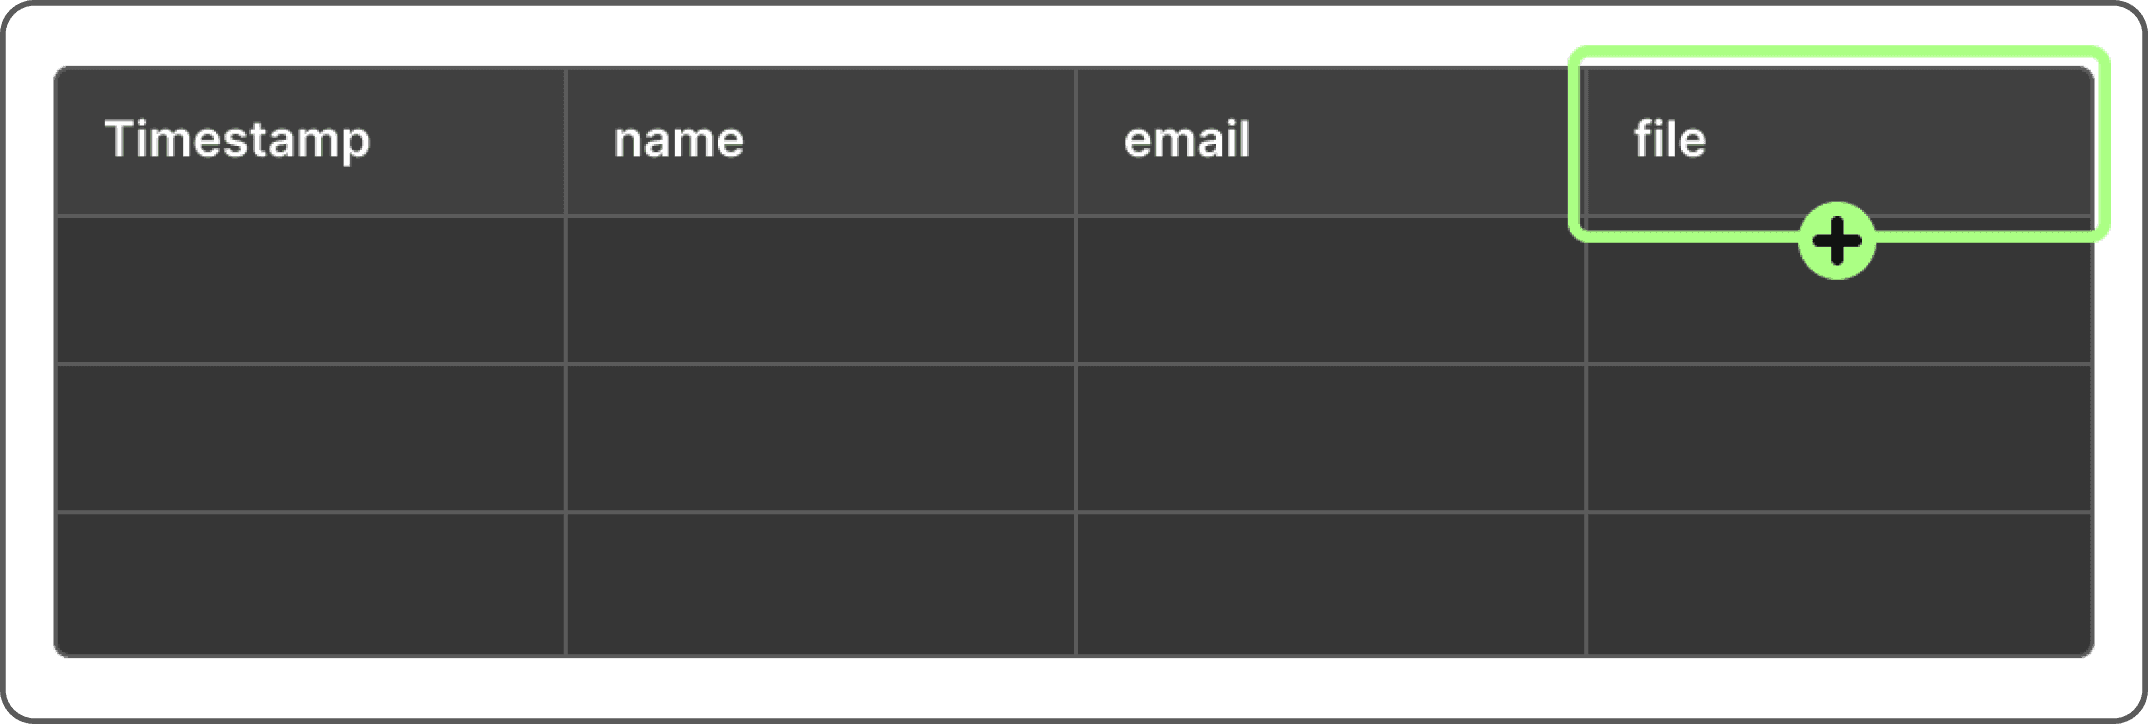
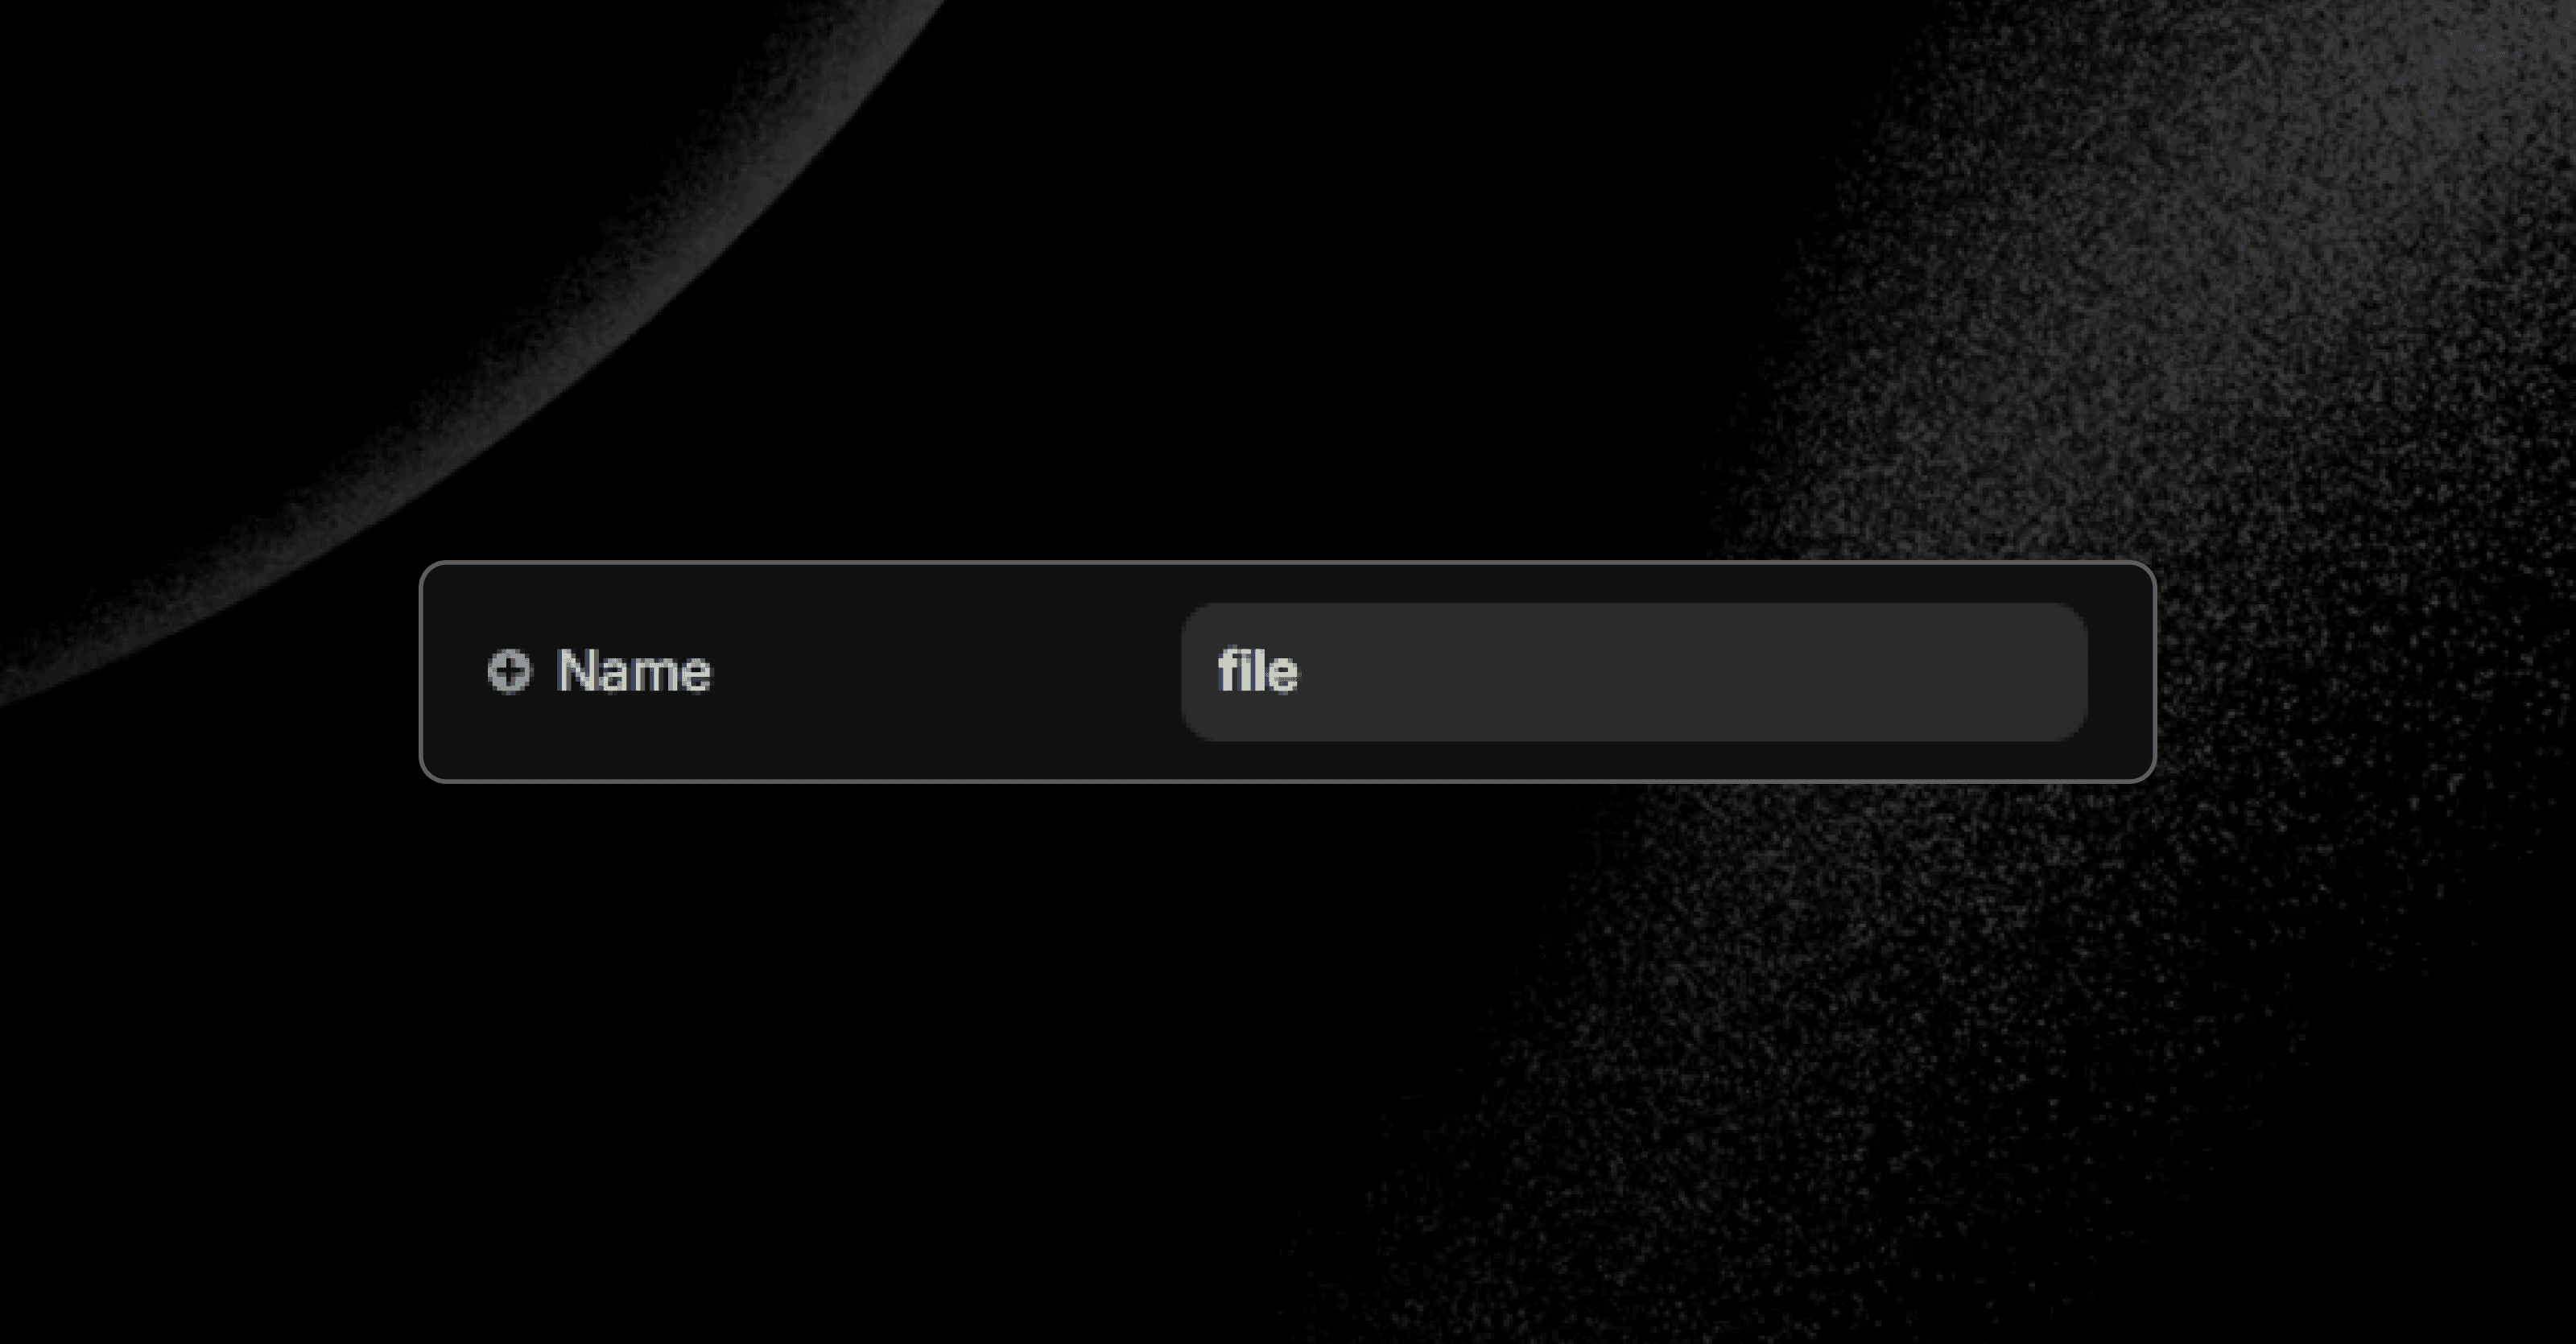
In Framer: Give your component a Name (e.g., file).
In Spreadsheet: Create a new column header with the exact same name (
file).If these don't match, the file link won't show up in your sheet!
02
Choose a Provider
Google Drive.
Files upload directly to a folder in your Google Drive
Choose a Provider
What you'll need:
A Google account. Setup takes about 10 minutes and only needs to be done once.
01
Create a Google Drive folder
01
Open Google Drive
Go to drive.google.com and sign in with your Google account.
02
Create a new folder
Right-click on any empty area → select New folder→ name it uploads → click Create.
03
Copy the folder URL
Open the folder. Look at the browser URL bar — it looks like:https://drive.google.com/drive/folders/1aBcDeFgHiJkLmN_EXAMPLE
Copy the entire URL from the address bar.
You'll paste it directly into the script — no need to extract any ID.
02
Create the Apps Script
01
Open Google Apps Script
Go to script.google.com → click New Project
01
Open Google Apps Script
Go to script.google.com → click New Project
02
Replace the code
Copy Code
Copied
// ─────────────────────────────────────────────────────────────
// File Upload Component — Google Drive Backend
// ─────────────────────────────────────────────────────────────
//
// SETUP:
// 1. Replace PASTE_YOUR_FOLDER_URL_HERE with your Google Drive folder URL
//    Example: https://drive.google.com/drive/folders/1aBcDeFgHiJk
// 2. Save the project (Ctrl+S)
// 3. Deploy as Web App:
//    - Execute as: Me
//    - Who has access: Anyone
// 4. Copy the Web App URL and paste it into Framer
// ─────────────────────────────────────────────────────────────

const FOLDER_URL = "PASTE_YOUR_FOLDER_URL_HERE"

// ─────────────────────────────────────────────────────────────

function doPost(e) {
  try {

    // 1. Validate required parameters
    if (!e.parameter.filename) {
      return jsonError("Missing parameter: filename", 400)
    }
    if (!e.parameter.mimeType) {
      return jsonError("Missing parameter: mimeType", 400)
    }
    if (!e.postData || !e.postData.contents) {
      return jsonError("Missing file data in request body.", 400)
    }

    // 2. Sanitize filename
    const filename = sanitizeFilename(e.parameter.filename)
    if (!filename) {
      return jsonError("Invalid or empty filename.", 400)
    }
    const mimeType = e.parameter.mimeType

    // 3. Parse body — the component sends JSON.stringify([...new Int8Array(arrayBuffer)])
    let fileData
    try {
      fileData = JSON.parse(e.postData.contents)
    } catch (parseErr) {
      Logger.log("JSON parse error: " + parseErr.toString())
      return jsonError("Invalid file data format.", 400)
    }

    if (!Array.isArray(fileData) || fileData.length === 0) {
      return jsonError("File data is empty or not an array.", 400)
    }

    // 4. Get Drive folder (ID is extracted from FOLDER_URL automatically)
    const folderId = extractFolderId(FOLDER_URL)
    if (!folderId) {
      return jsonError("Invalid FOLDER_URL — could not extract folder ID.", 500)
    }

    let folder
    try {
      folder = DriveApp.getFolderById(folderId)
      folder.getName() // triggers error if folder is inaccessible
    } catch (folderErr) {
      Logger.log("Folder error: " + folderErr.toString())
      return jsonError("Cannot access Drive folder. Check FOLDER_URL and permissions.", 500)
    }

    // 5. Build Blob from byte array (proven working method)
    let blob
    try {
      const bytes = Utilities.newBlob(fileData).getBytes()
      blob = Utilities.newBlob(bytes, mimeType, filename)
    } catch (blobErr) {
      Logger.log("Blob error: " + blobErr.toString())
      return jsonError("Failed to process file data.", 400)
    }

    // 6. Save file to Drive
    let file
    try {
      file = folder.createFile(blob)
    } catch (createErr) {
      Logger.log("Create file error: " + createErr.toString())
      return jsonError("Failed to save file to Google Drive.", 500)
    }

    // 7. Make file publicly accessible via link
    try {
      file.setSharing(DriveApp.Access.ANYONE_WITH_LINK, DriveApp.Permission.VIEW)
    } catch (shareErr) {
      Logger.log("Share error (non-fatal): " + shareErr.toString())
    }

    // 8. Return success with file ID
    Logger.log("Upload success | ID: " + file.getId() + " | Name: " + filename)

    return ContentService
      .createTextOutput(JSON.stringify({
        success: true,
        fileId: file.getId(),
        fileName: file.getName(),
        mimeType: file.getMimeType()
      }))
      .setMimeType(ContentService.MimeType.JSON)

  } catch (err) {
    Logger.log("Unhandled error: " + err.toString())
    return jsonError("Internal server error: " + err.message, 500)
  }
}

// Health check — open the Web App URL in your browser to verify it's working
function doGet() {
  const folderId = extractFolderId(FOLDER_URL)
  return ContentService
    .createTextOutput(JSON.stringify({
      status: "File Upload Script is running ✓",
      folderConfigured: !!folderId,
      folderId: folderId || "NOT FOUND — check FOLDER_URL"
    }))
    .setMimeType(ContentService.MimeType.JSON)
}

// Extracts Folder ID from various Google Drive URL formats:
// - https://drive.google.com/drive/folders/FOLDER_ID
// - https://drive.google.com/drive/folders/FOLDER_ID?hl=id
// - Also accepts a raw folder ID string directly
function extractFolderId(url) {
  if (!url || typeof url !== "string") return null
  const match = url.match(/\/folders\/([a-zA-Z0-9_-]+)/)
  if (match && match[1]) return match[1]
  const matchQs = url.match(/[?&]id=([a-zA-Z0-9_-]+)/)
  if (matchQs && matchQs[1]) return matchQs[1]
  if (url.length >= 20 && url.length <= 60 && /^[a-zA-Z0-9_-]+$/.test(url)) return url
  return null
}

// Sanitizes filename to prevent path traversal and special character issues
function sanitizeFilename(filename) {
  if (!filename || typeof filename !== "string") return null

  let s = filename
    .replace(/\.\./g, "")
    .replace(/[\/\\]/g, "")
    .replace(/[<>:"|?*]/g, "_")
    .replace(/[\x00-\x1F]/g, "")
    .trim()

  if (s.length === 0) return null

  if (s.length > 255) {
    const ext = s.lastIndexOf(".") > -1 ? s.substring(s.lastIndexOf(".")) : ""
    s = s.substring(0, 255 - ext.length) + ext
  }

  return s
}

// Returns a structured JSON error response
function jsonError(message, statusCode) {
  Logger.log("ERROR " + statusCode + ": " + message)
  return ContentService
    .createTextOutput(JSON.stringify({
      success: false,
      error: message,
      statusCode: statusCode
    }))
    .setMimeType(ContentService.MimeType.JSON)
}
Select all existing code in the editor and delete it. Then paste the code below. Find the line that says YOUR_FOLDER_URL_HERE and replace it with the full Google Drive folder URL you copied.
03
Save the project
Press Ctrl+S (or Cmd+S on Mac). Give the project a name like FileUpload.
03
Save the project
Press Ctrl+S (or Cmd+S on Mac). Give the project a name like FileUpload.
04
Deploy as Web App

Click Deploy (top right) → New deployment → click the ⚙️ gear icon next to "Type" → choose Web app. Fill in:
Description:
File Upload V.01(anything is fine)Execute as:Me
Who has access:Anyone
Click Deploy.
A permissions popup will appear — click Authorize access → choose your Google account → click Allow.
warning will appear: “This app isn’t verified.”
→ Click Advanced → Go to [your project] (unsafe)
Choose your account → Allow access to Google Drive.
⚠️ This step gives your script permission to upload files to your own Google Drive.
04
Deploy as Web App
Click Deploy (top right) → New deployment → click the ⚙️ gear icon next to "Type" → choose Web app. Fill in:
Description:
File Upload V.01(anything is fine)Execute as:Me
Who has access:Anyone
Click Deploy.
A permissions popup will appear — click Authorize access → choose your Google account → click Allow.
warning will appear: “This app isn’t verified.”
→ Click Advanced → Go to [your project] (unsafe)
Choose your account → Allow access to Google Drive.
⚠️ This step gives your script permission to upload files to your own Google Drive.
05
Copy the Web App URL
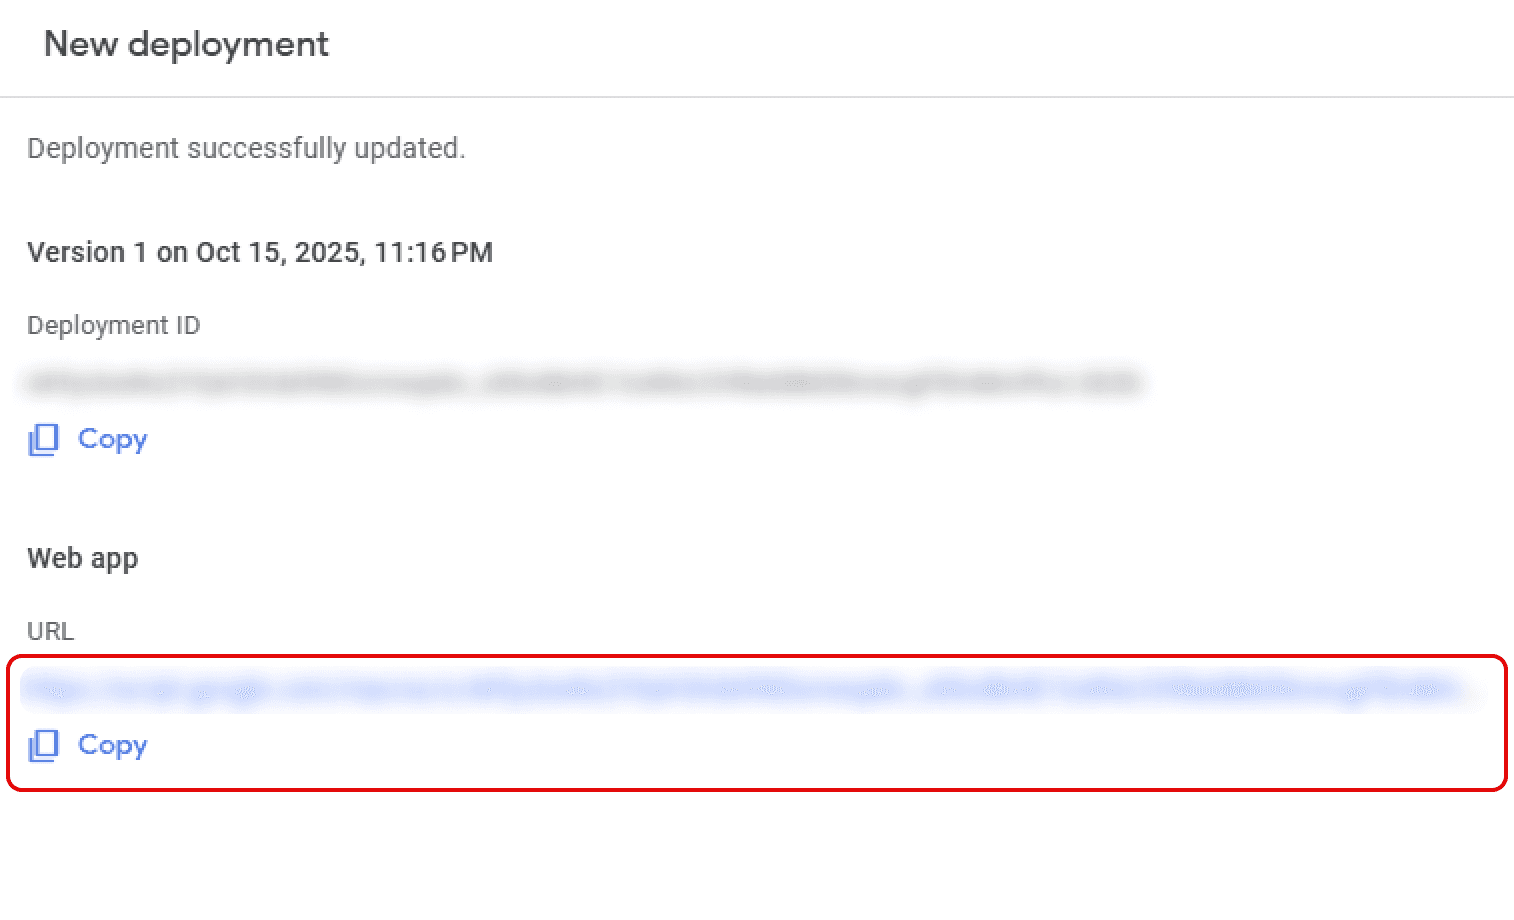
After deploying, a URL appears — it looks like:https://script.google.com/macros/s/AKfycb.../exec
Copy this — you'll paste it into Framer.
05
Copy the Web App URL
After deploying, a URL appears — it looks like:https://script.google.com/macros/s/AKfycb.../exec
Copy this — you'll paste it into Framer.
06
Every time you edit the script code, you must create a New deployment
Not redeploy the existing one. Otherwise your changes won't take effect.
06
Every time you edit the script code, you must create a New deployment
Not redeploy the existing one. Otherwise your changes won't take effect.
03
Configure in Framer
01
Click the component on your canvas, then in the right panel set:

ProviderSelect Google Drive
Web App URLPaste the .../exec URL you copied
File Link TypeDownloadable = download link | Preview Only = opens in browser
01
Click the component on your canvas, then in the right panel set:
ProviderSelect Google Drive
Web App URLPaste the .../exec URL you copied
File Link TypeDownloadable = download link | Preview Only = opens in browser
Done
Publish and test your form.
Cloudinary
Cloudinary Setup
Choose a Provider
The easiest provider — no server, no scripts, just two copy-paste values
01
Create a free account
01
Sign up at Cloudinary
Go to cloudinary.com → click Sign Up for Free. No credit card required.
01
Sign up at Cloudinary
Go to cloudinary.com → click Sign Up for Free. No credit card required.
02
Find your Cloud Name
After logging in, your dashboard showsCloud Nameat the top — it looks like dxyz12abc. Copy it.
02
Find your Cloud Name
After logging in, your dashboard showsCloud Nameat the top — it looks like dxyz12abc. Copy it.
02
Create an Upload Preset
Create an Upload Preset
01
Important Setup
An "Upload Preset" is a saved configuration that tells Cloudinary how to handle uploads.
You need to create one in Unsigned mode so that uploads can happen directly from a browser without exposing your secret key.
01
Important Setup
An "Upload Preset" is a saved configuration that tells Cloudinary how to handle uploads.
You need to create one in Unsigned mode so that uploads can happen directly from a browser without exposing your secret key.
02
Add an Upload Preset
Scroll down to the Upload Presets section → click Add upload preset.
02
Add an Upload Preset
Scroll down to the Upload Presets section → click Add upload preset.
03
Set the preset to Unsigned
Preset name: type anything, e.g. my_uploads
Signing Mode: change from "Signed" to Unsigned ← this is critical!
03
Set the preset to Unsigned
Preset name: type anything, e.g. my_uploads
Signing Mode: change from "Signed" to Unsigned ← this is critical!
04
Save and note the preset name
ClickSave. The preset name (e.g. my_uploads) is what you'll paste into Framer.
04
Save and note the preset name
ClickSave. The preset name (e.g. my_uploads) is what you'll paste into Framer.
03
Configure in Framer
01
Click the component on your canvas, then in the right panel set:
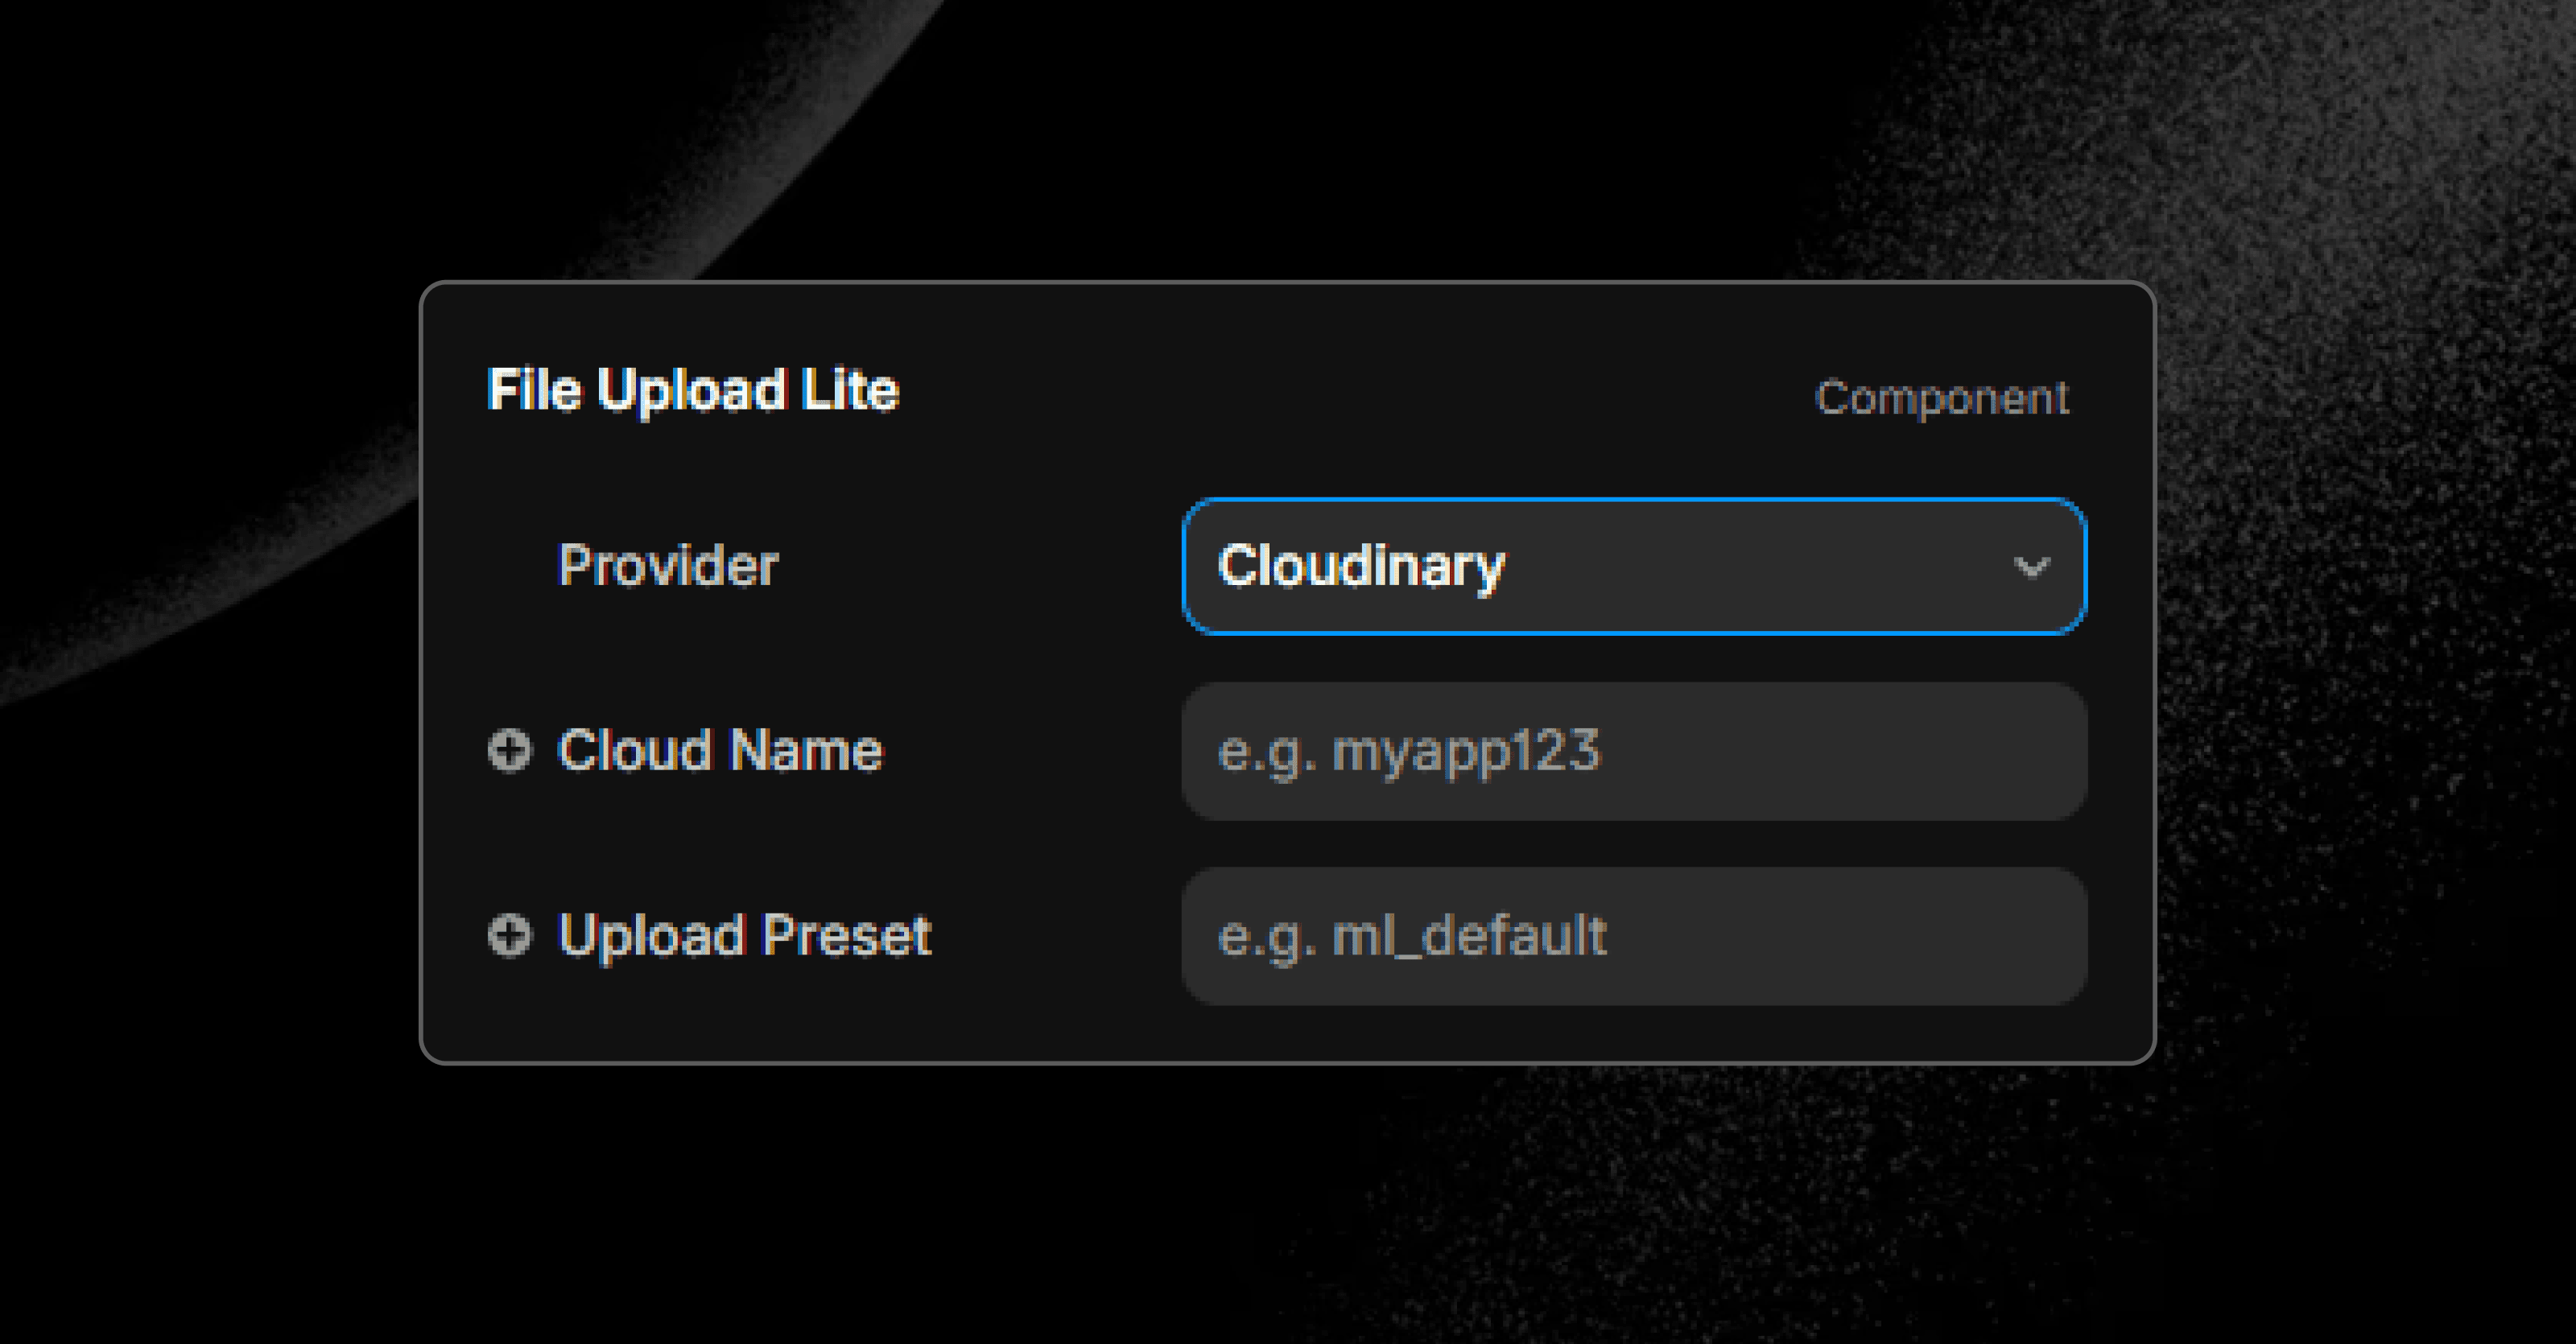
ProviderSelect Cloudinary
Cloud NameYour Cloud Name (e.g. dxyz12abc)
Upload PresetThe preset name you created (e.g. my_uploads)
01
Click the component on your canvas, then in the right panel set:
ProviderSelect Cloudinary
Cloud NameYour Cloud Name (e.g. dxyz12abc)
Upload PresetThe preset name you created (e.g. my_uploads)
Done
Publish and test your form.
Supabase
Supabase Setup
Choose a Provider
Open-source storage with a clean dashboard
01
Create a project
01
Sign up at Supabase
Go to supabase.com → click Start your project → sign in with Google.
01
Sign up at Supabase
Go to supabase.com → click Start your project → sign in with Google.
02
Create a new project
ClickNew project→ enter a name → set a database password (save it somewhere safe) → choose a region nearest to your users → clickCreate new project. Wait about 60 seconds for it to initialize.
02
Create a new project
ClickNew project→ enter a name → set a database password (save it somewhere safe) → choose a region nearest to your users → clickCreate new project. Wait about 60 seconds for it to initialize.
02
Create a Storage Bucket
01
Go to Storage
In the left sidebar, click Storage
01
Go to Storage
In the left sidebar, click Storage
02
Create a new bucket
Click New bucket → set the name to uploads → enable the Public bucket toggle → click Save.
02
Create a new bucket
Click New bucket → set the name to uploads → enable the Public bucket toggle → click Save.
03
Important Setup
The bucketmustbe set to Public so that file URLs can be accessed after upload.
03
Important Setup
The bucketmustbe set to Public so that file URLs can be accessed after upload.
Supabase uses security policies to control who can upload or download files. You need to run two short SQL commands to allow your website to upload files and make them publicly accessible. You don't need to understand the code — just copy and run it.
03
Run the SQL Policy
01
Open the SQL Editor
In the left sidebar, click SQL Editor→ click New query.
01
Open the SQL Editor
In the left sidebar, click SQL Editor→ click New query.
02
Paste and run the SQL below
Copy Code
Copied
-- Allow anyone to upload files to the "uploads" bucket
-- This is required so your Framer site can send files
CREATE POLICY "Allow public uploads"
ON storage.objects
FOR INSERT
TO anon
WITH CHECK (bucket_id = 'uploads');

-- Allow anyone to read/download uploaded files
CREATE POLICY "Allow public read"
ON storage.objects
FOR SELECT
TO anon
USING (bucket_id = 'uploads');
Copy the entire block, paste it into the editor, then click the green Run.
You should see"Success. No rows returned"after running — this is correct. The SQL executed successfully.
04
Get your API credentials
01
Go to Project Settings → API
Click the ⚙️ gear icon at the bottom of the left sidebar → click API.
01
Go to Project Settings → API
Click the ⚙️ gear icon at the bottom of the left sidebar → click API.
02
Copy two values
Project URL — looks like
https://abcdefgh.supabase.co
anon public key — a very long string starting with
eyJ...
02
Copy two values
Project URL — looks like
https://abcdefgh.supabase.co
anon public key — a very long string starting with
eyJ...
05
Configure in Framer
01
Click the component on your canvas, then in the right panel set:
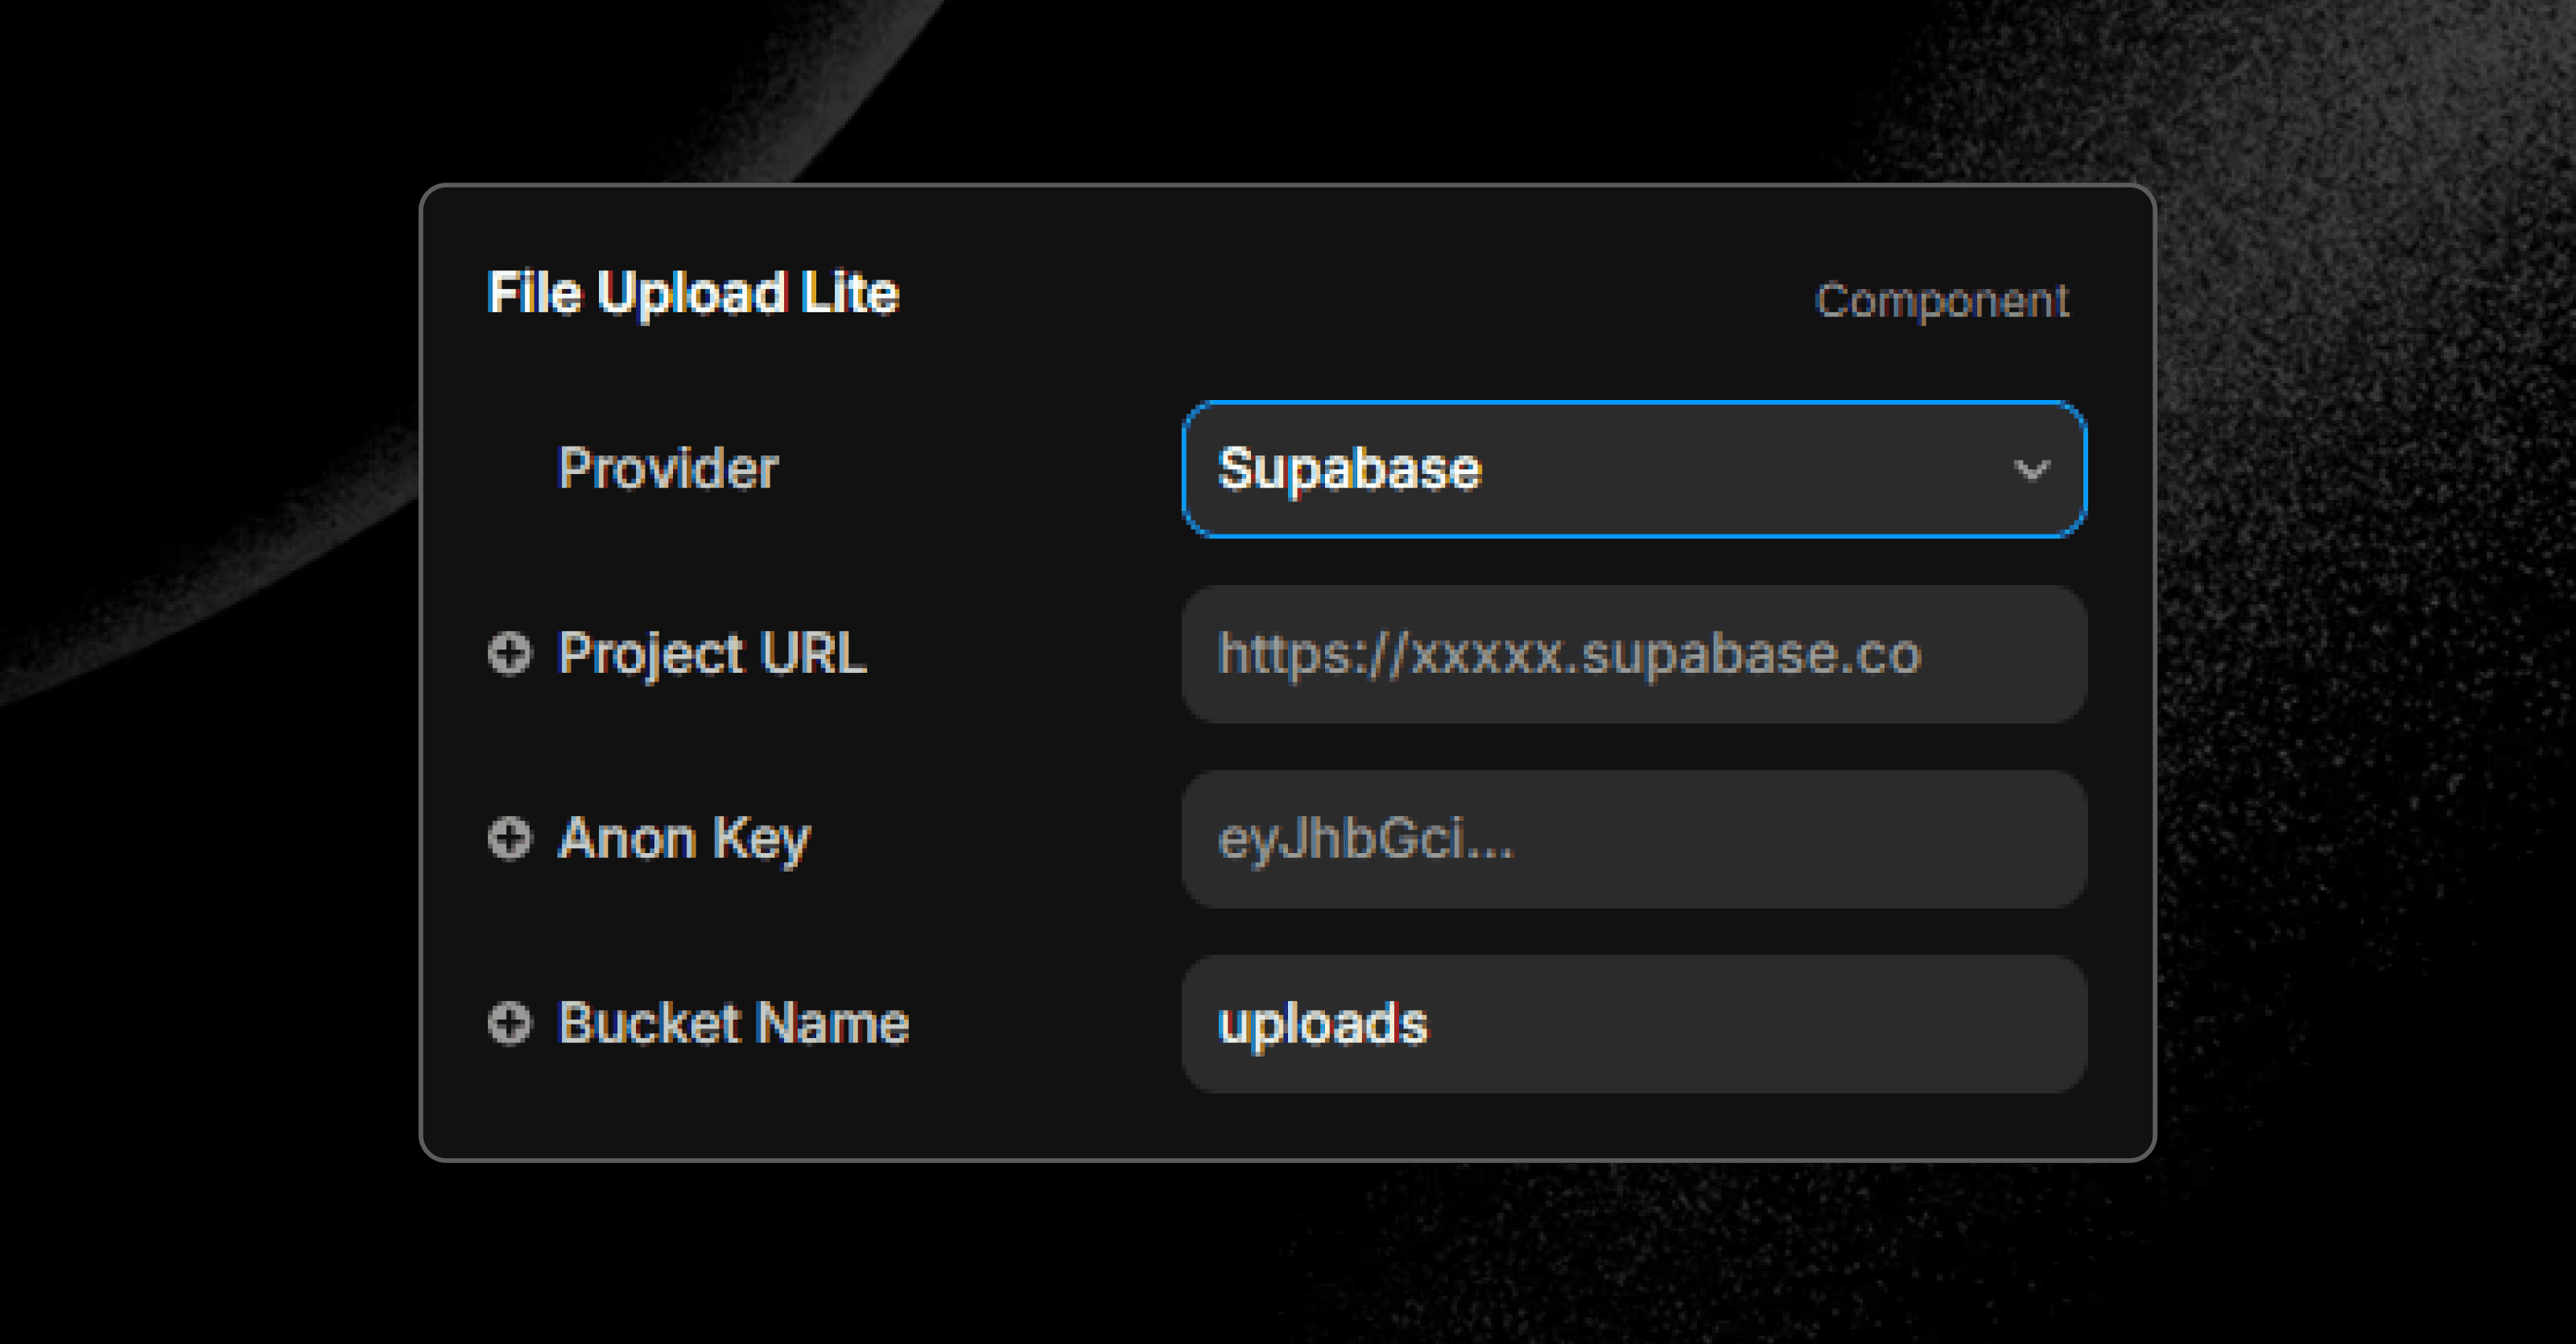
ProviderSelect Supabase
Project URLe.g. https://abcdefgh.supabase.co
Anon KeyThe long eyJ... string from Settings → API
Bucket NameType uploads (or whatever you named your bucket)
01
Click the component on your canvas, then in the right panel set:
ProviderSelect Supabase
Project URLe.g. https://abcdefgh.supabase.co
Anon KeyThe long eyJ... string from Settings → API
Bucket NameType uploads (or whatever you named your bucket)
Done
Publish and test your form.
Cloudflare R2
Cloudflare R2 Setup
Choose a Provider
Best for large files. Slightly more steps
than other providers, but still no real coding required — you're just copy-pasting a ready-made script into Cloudflare's dashboard.
01
Create your R2 bucket
01
Sign up at Cloudflare
Go to cloudflare.com → click Sign up. The free plan is all you need.
01
Sign up at Cloudflare
Go to cloudflare.com → click Sign up. The free plan is all you need.
02
Open R2 Object Storage
In the left sidebar, click R2 Object Storage. If prompted, verify your email first.
02
Open R2 Object Storage
In the left sidebar, click R2 Object Storage. If prompted, verify your email first.
03
Create a bucket
Click Create bucket→ name it uploads → leave all other settings as default → click Create bucket.
03
Create a bucket
Click Create bucket→ name it uploads → leave all other settings as default → click Create bucket.
04
Enable CORS Policy
Copy Code
Copied
[
  {
    "AllowedOrigins": ["*"],
    "AllowedMethods": ["GET", "PUT", "POST", "DELETE", "HEAD"],
    "AllowedHeaders": ["*"],
    "ExposeHeaders": ["ETag"],
    "MaxAgeSeconds": 3600
  }
]
Open your bucket → click the Settings tab
Find CORS Policy → click Add CORS Policy→ paste the JSON below → click Save.
04
Enable the Public Development URL
Still in the Settings tab → find Public Development URL→ click Allow Access→ confirm. A URL like https://pub-xxxxxxxx.r2.dev will appear. Copy it.
04
Enable the Public Development URL
Still in the Settings tab → find Public Development URL→ click Allow Access→ confirm. A URL like https://pub-xxxxxxxx.r2.dev will appear. Copy it.
02
Create a Cloudflare Worker
A "Worker" is a tiny script that runs on Cloudflare's servers and acts as the secure bridge between your Framer site and R2 storage. You don't need to understand the code — just paste it in.
01
Go to Workers & Pages
In the Cloudflare sidebar → click Workers & Pages→ click Create→ click Create Worker.
01
Go to Workers & Pages
In the Cloudflare sidebar → click Workers & Pages→ click Create→ click Create Worker.
02
Name your Worker and deploy
Name it file-upload-worker → click Deploy.
02
Name your Worker and deploy
Name it file-upload-worker → click Deploy.
03
Open the code editor
Click Edit Code. An editor will appear with some placeholder code. Delete everything in it.
03
Open the code editor
Click Edit Code. An editor will appear with some placeholder code. Delete everything in it.
04
Paste the Worker code below
Copy Code
Copied
// ─────────────────────────────────────────────────────────────
// IMPORTANT: Replace the URL below with your R2 Public URL
// It looks like: https://pub-xxxxxxxxxxxxxxxx.r2.dev
// ─────────────────────────────────────────────────────────────
const PUBLIC_URL = "https://pub-REPLACE_THIS.r2.dev"

export default {
  async fetch(request, env) {
    const url = new URL(request.url)

    const corsHeaders = {
      "Access-Control-Allow-Origin": "*",
      "Access-Control-Allow-Methods": "GET,POST,PUT,OPTIONS",
      "Access-Control-Allow-Headers": "Content-Type,Cache-Control",
    }

    // Browser sends a preflight "OPTIONS" request before uploading
    if (request.method === "OPTIONS") {
      return new Response(null, { headers: corsHeaders })
    }

    try {

      // ── Serve uploaded files (e.g. for image previews) ──
      if (request.method === "GET") {
        const key = url.pathname.slice(1)
        if (!key) return Response.json({ ok: true }, { headers: corsHeaders })
        const object = await env.R2_BUCKET.get(key)
        if (!object) return Response.json({ error: "File not found" }, { status: 404, headers: corsHeaders })
        return new Response(object.body, {
          headers: {
            ...corsHeaders,
            "Content-Type": object.httpMetadata?.contentType || "application/octet-stream",
            "Cache-Control": "public, max-age=31536000",
          },
        })
      }

      // ── Upload small files (100MB or less) ──────────────
      if (url.pathname === "/upload" && request.method === "POST") {
        const formData = await request.formData()
        const file = formData.get("file")
        if (!file) return Response.json({ error: "No file received" }, { status: 400, headers: corsHeaders })
        const key = `uploads/${Date.now()}-${file.name}`
        await env.R2_BUCKET.put(key, file.stream(), {
          httpMetadata: { contentType: file.type },
        })
        return Response.json({ url: `${PUBLIC_URL}/${key}` }, { headers: corsHeaders })
      }

      // ── Start multipart upload for files larger than 100MB ─
      if (url.pathname === "/upload/init" && request.method === "POST") {
        const { filename, mimeType } = await request.json()
        const key = `uploads/${Date.now()}-${filename}`
        const multipart = await env.R2_BUCKET.createMultipartUpload(key, {
          httpMetadata: { contentType: mimeType },
        })
        return Response.json({ uploadId: multipart.uploadId, key }, { headers: corsHeaders })
      }

      // ── Upload each chunk of a large file ───────────────
      if (url.pathname === "/upload/part" && request.method === "PUT") {
        const uploadId = url.searchParams.get("uploadId")
        const key = url.searchParams.get("key")
        const partNumber = parseInt(url.searchParams.get("partNumber"))
        const multipart = env.R2_BUCKET.resumeMultipartUpload(key, uploadId)
        const part = await multipart.uploadPart(partNumber, request.body)
        return Response.json({ etag: part.etag }, { headers: corsHeaders })
      }

      // ── Finalize the multipart upload ───────────────────
      if (url.pathname === "/upload/complete" && request.method === "POST") {
        const { uploadId, key, parts } = await request.json()
        const multipart = env.R2_BUCKET.resumeMultipartUpload(key, uploadId)
        await multipart.complete(parts)
        return Response.json({ url: `${PUBLIC_URL}/${key}` }, { headers: corsHeaders })
      }

      return Response.json({ error: "Not found", path: url.pathname }, { status: 404, headers: corsHeaders })

    } catch (err) {
      return Response.json({ error: err.message }, { status: 500, headers: corsHeaders })
    }
  },
}
After pasting, find the line const PUBLIC_URL = "..." and replace the value with your https://pub-xxx.r2.dev URL from the previous step.
05
Deploy the Worker
Click Deploy in the top right. You'll see a success message.
05
Deploy the Worker
Click Deploy in the top right. You'll see a success message.
06
Copy your Worker URL
On the Worker overview page, your URL is shown — it looks like:https://file-upload-worker.yourname.workers.dev
Copy this.
06
Copy your Worker URL
On the Worker overview page, your URL is shown — it looks like:https://file-upload-worker.yourname.workers.dev
Copy this.
03
Connect Worker to your R2 bucket (Binding)
01
Open Worker Settings
Click on your Worker → click Settings tab → scroll to Bindings section.
01
Open Worker Settings
Click on your Worker → click Settings tab → scroll to Bindings section.
02
Add an R2 Binding
Click Add→ select R2 Bucket→ fill in:
Variable name:
R2_BUCKET← must be exactly this, capital letters!R2 bucket: select
uploadsfrom the dropdown.
Click Save. The Worker automatically redeploys with the new connection.
02
Add an R2 Binding
Click Add→ select R2 Bucket→ fill in:
Variable name:
R2_BUCKET← must be exactly this, capital letters!R2 bucket: select
uploadsfrom the dropdown.
Click Save. The Worker automatically redeploys with the new connection.
04
Configure in Framer
01
Open Worker Settings
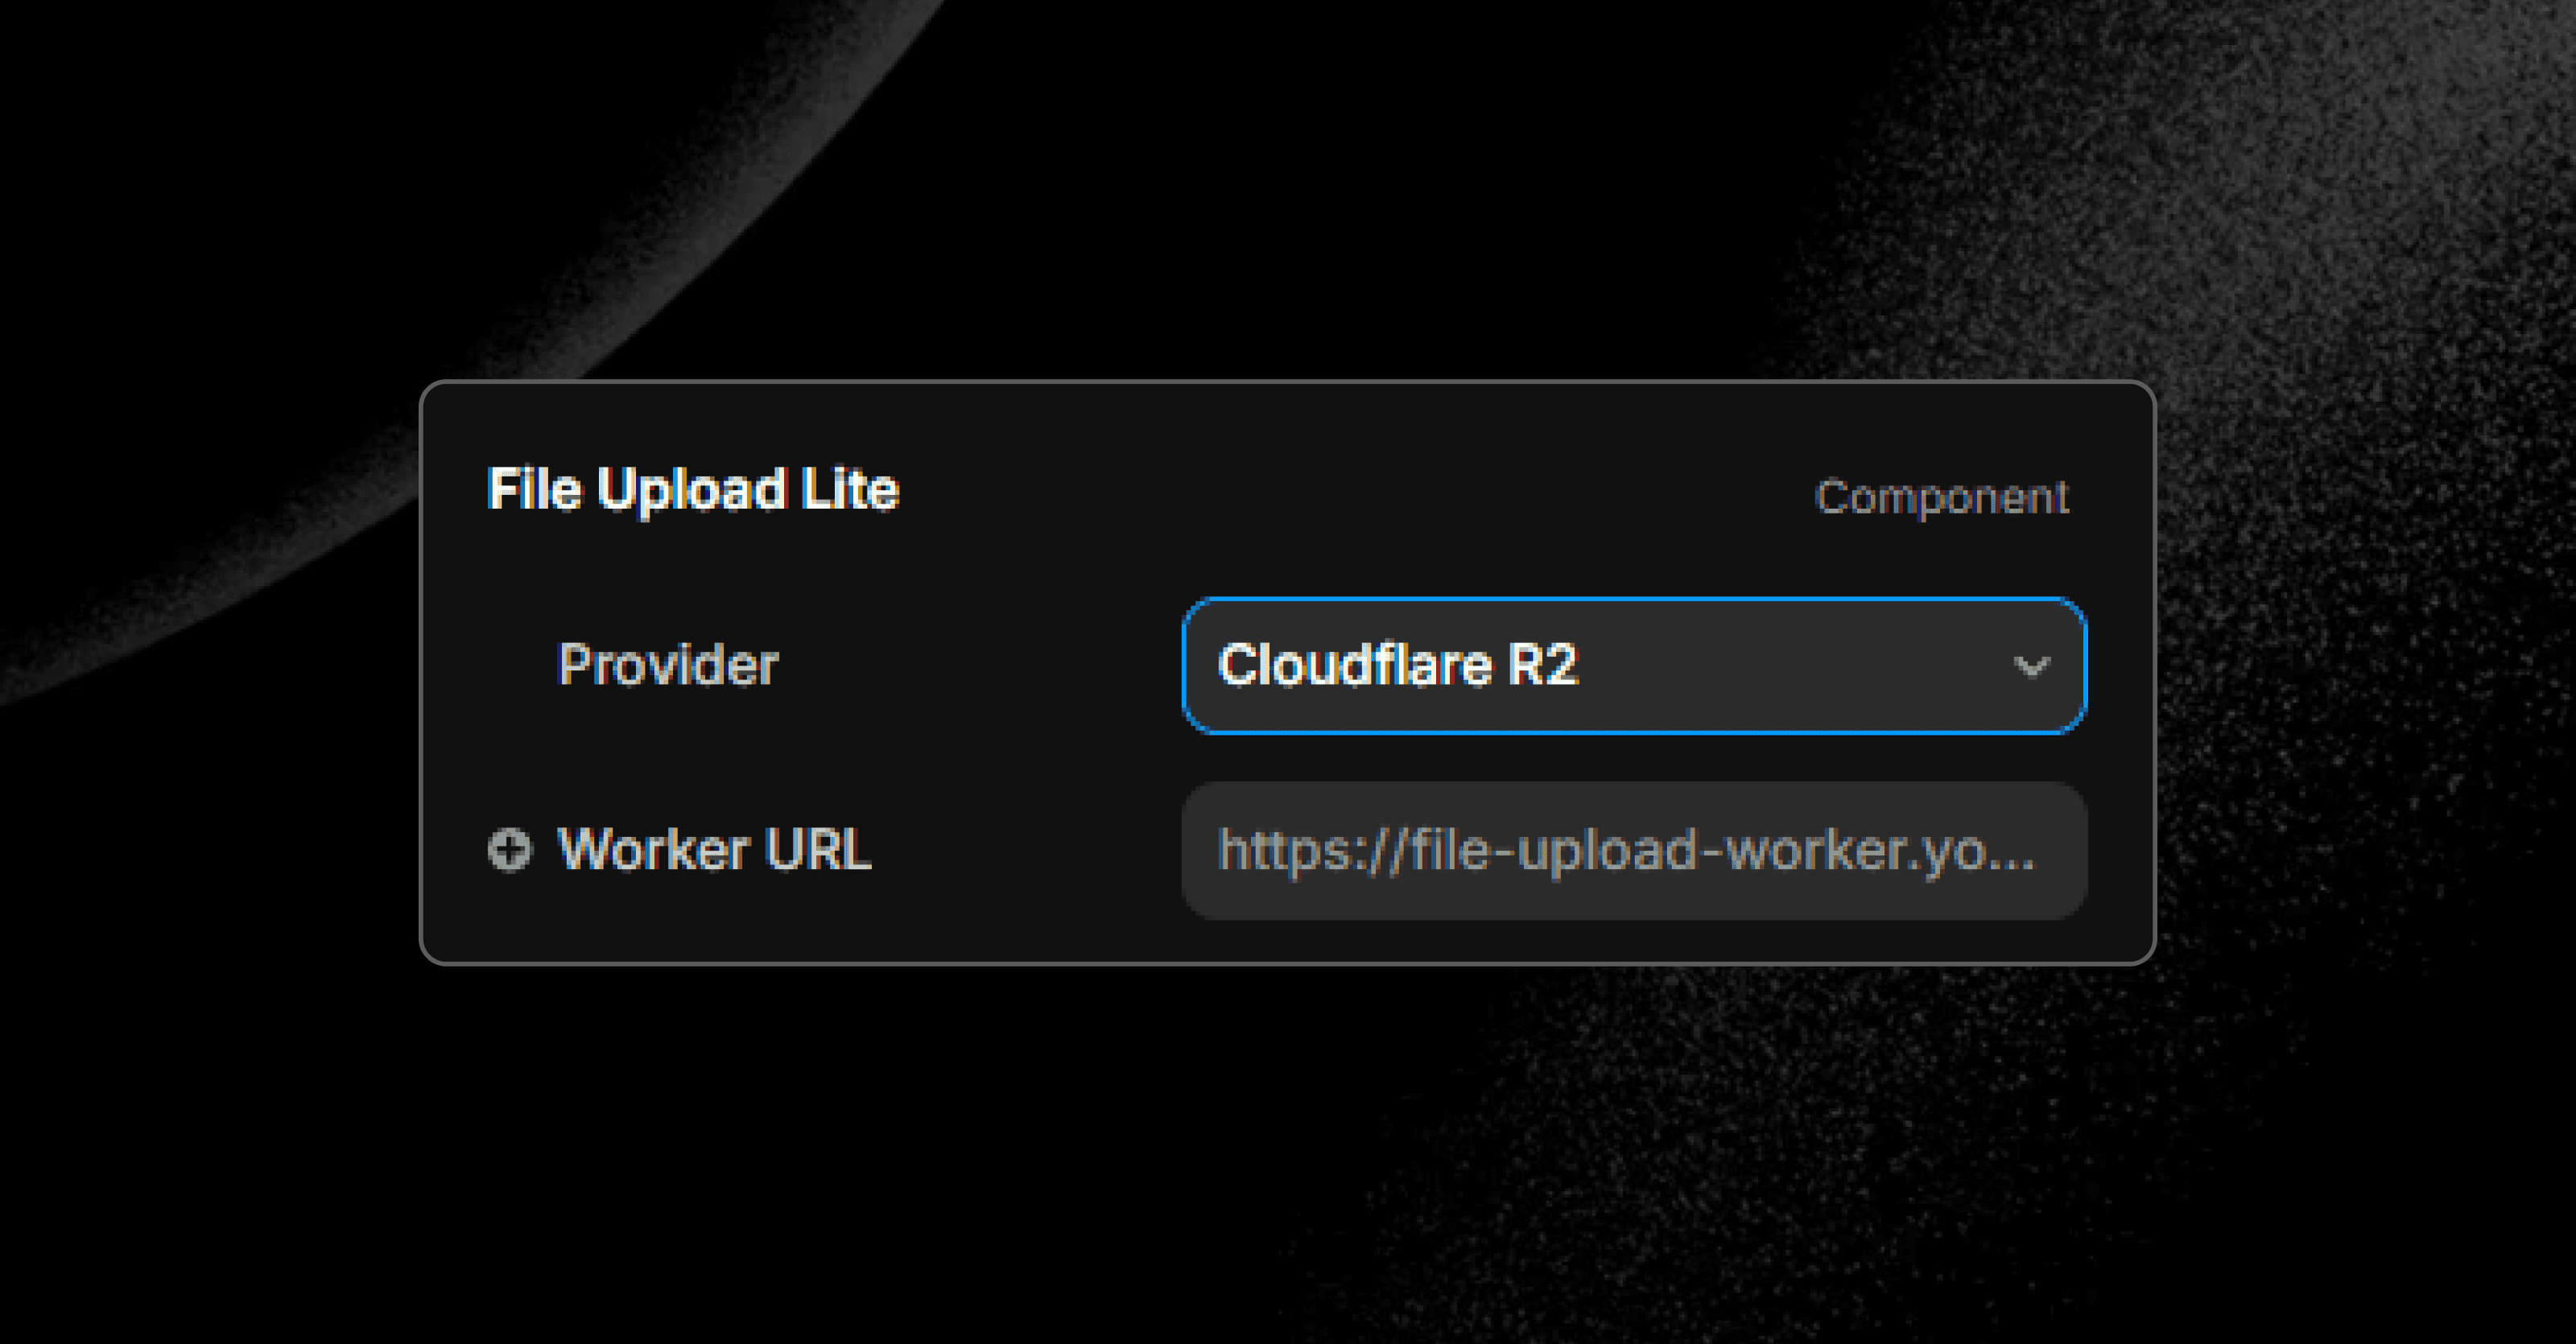
ProviderSelect Cloudflare R2
Worker URLe.g. https://file-upload-worker.yourname.workers.dev
No trailing slash! The URL should end with .dev — not .dev/.
01
Open Worker Settings
ProviderSelect Cloudflare R2
Worker URLe.g. https://file-upload-worker.yourname.workers.dev
No trailing slash! The URL should end with .dev — not .dev/.
Done
Publish and test your form.
Need help?
Support Section
Need help or want to support further development? Get in touch and support this project to keep updates coming.